Blog
Queueing Commands In Divi 5 To Build Your Layouts
Building a new section on a site with an established design system is where Divi 5‘s Command Center becomes especially useful. On a site without presets, creating a new section usually means two separate tasks. First, you build the structure. Then you open the settings panel and apply the design choices manually.
On a site with a well-defined design system, many of those decisions are already saved as presets. The Command Center’s queueing system lets you build the structure and attach presets as you go. You can do it all from the keyboard. Instead of creating each element and assigning presets one by one, you can queue the entire section and run it in a single pass.
In this tutorial, we’ll add a dark CTA section to the bottom of a homepage. It will use a centered single-column layout with a heading, supporting text, and a button. The section will use existing presets and be built using a single command queue.
Before You Build
Before opening the Command Center, do two quick things. First, select the section that should act as the insertion point for the new content. Second, make sure the presets you plan to use already exist and are named clearly enough to find quickly.
That small bit of setup makes queueing much smoother. Instead of stopping mid-build to search for presets or rethink structure, you can stay focused on the section you want to create.
Building The Queue
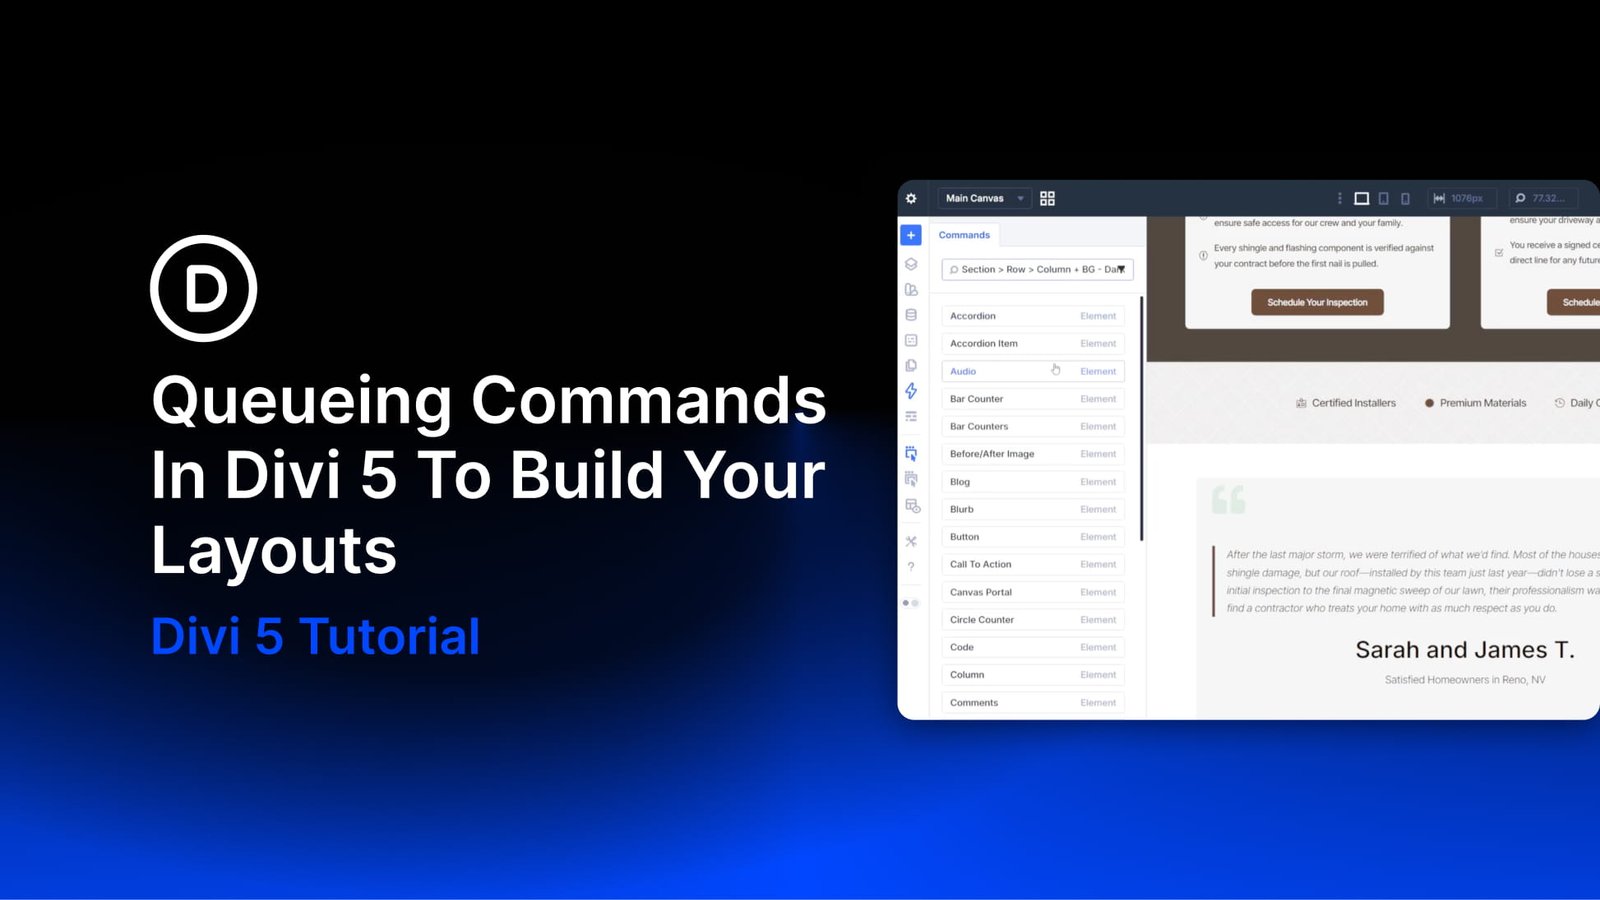
Click the last section on the page to select it. This tells the Command Center where to insert the new section. Then open the Command Center with CMD+K on Mac or CTRL+K on Windows.
Type each element name, then press Shift+Enter to add it to the queue. This keeps the queue building instead of running right away.
Use the > operator to nest each element inside the one before it. Use the + operator to attach a preset to the element that comes before it. To add multiple presets to the same element, repeat the + operator. You can also use the * operator to duplicate elements in the queue, which is useful for repeated columns, buttons, cards, or other repeated layout parts.
Build the queue like this:
Section > Row > Column + Spacing Medium + BG Dark + Container Corners > Heading + Text Headings Light > Text + Body Text Light > Button + Off-White
Once the full queue is built, press Enter to run it. Divi will create the full structure and apply the queued presets in one pass.
Remember that Enter executes the queue. Shift+Enter keeps building it. You also do not need to type full preset names. You only need to type enough of the name to surface the correct match in the results list before queueing it.
If that command string looks dense at first, here is what it does. It adds a Section, Row, and Column. It then applies three presets to the Column.
After that, it adds a Heading, Text module, and Button. Each one gets its preset inline, so every module is styled as soon as the queue runs.
More Queue Examples To Try
Once you understand the basic pattern, it becomes much easier to imagine other repeatable sections you can build the same way. The examples below are not meant to match one exact preset library. They are meant to show how queueing becomes more useful as your design system grows.
- Three-card feature row: Section > Row > Column *3 > Blurb + Feature Card
This is useful when you need a fast starting point for a services, features, or benefits section. The *3 operator creates three repeated columns, and each Blurb can inherit the same card preset. - Testimonial strip: Section > Row > Column *3 > Testimonial + Testimonial Card Light
This is a practical pattern for review sections where each card uses the same layout and styling. Once the structure is in place, you only need to swap in the actual testimonial content. - Simple icon list: Section > Row > Column > Blurb + Icon List Item *4
This works well for feature checklists, service lists, or process summaries. Instead of adding each item one by one, you can build the repeated stack immediately and then edit the copy. - Two-button callout: Section > Row > Column + Container Light > Heading + Text Headings Dark > Text + Body Text Dark > Group + Button Row > Button + Primary *2
This is useful when a section needs two calls to action side by side. The Group gives both buttons a shared container, and the Button Row preset can handle the horizontal layout, spacing, and alignment. - Team row starter: Section > Row > Column *4 > Person + Team Card
This is a good example of queueing for repeated content blocks. If your team card styling is already saved as a preset, the queue can build the full starting layout in seconds.
These examples also show why queueing works best on sites with a mature preset library. The more reusable patterns you have already defined, the more practical it becomes to build new sections from short command strings.
When Queueing Is The Better Choice
Queueing is most useful when you already know the structure you want to build, and your styling system is already defined. That makes it a strong fit for repeatable sections such as CTAs, feature rows, card layouts, and other patterns you build often.
It is less useful when you are still exploring layout ideas or making one-off edits. In those cases, building directly on the canvas may still feel faster. But when the structure is clear, and the presets already exist, queueing eliminates much of the repetitive setup work.
How The Queue Compares To The Standard Workflow
The queue is not the only way to build in Divi. For a quick edit or a single module, it may not be the fastest option. Where it becomes especially useful is when you are building a fully styled section from scratch. This is even more true on a site that already uses a strong preset system.
In a more traditional workflow, you would add each element manually. Then you would open settings panels over and over. After that, you would assign presets one by one before adding content.
The queue reduces much of that setup work. It lets you build the structure and apply presets in the same command sequence. The more complete your design system is, the more time this can save. The same is true as you get more comfortable using the Command Center.
Start Using The Command Center In Divi 5 Today!
With the structure built and presets already applied, the remaining step is simple. Click into each module and add your real content. That includes the CTA heading, supporting copy, and button link.
Because the styling comes from your preset system, the section is already aligned with the rest of the site. That is the payoff of combining a design system with Command Center queueing.
Once your presets are in place, building a new section becomes much faster. You spend less time on repeated setup work in Divi 5. For defined, repeatable layouts, the settings panel becomes much less central to the process.